How to Track Airplanes with your own ADS-B Receiver
Use a Raspberry Pi to track local flights and get rewarded for doing so


-
-Ever wondered how airplanes are tracked? Traditionally, planes have been tracked with radar, but limitations like weak oceanic coverage make radar not the best solution. However, a new technology called Automatic Dependent Surveillance–Broadcast (ADS-B), is emerging as the new standard for aviation tracking.
What is ADS-B?

Unlike radar which detects location with radio signals from ground stations, ADS-B broadcasts location information collected from GNSS satellites like GPS. This collected information from GNSS systems (hence the "dependent" in ADS-B) can be sent to ATC ground stations or other planes.
ADS-B is cheaper than primary or secondary radar systems, enables pilots to view traffic information about surrounding planes, and even enables planes to receive additional data such as weather reports or temporary flight restrictions. Therefore it's no surprise ADS-B has played a huge role in modernizing the aviation industry. New initiatives like the FAA's Next Generation Air Transportation System (NextGen) have required all commercial flights in the US to have ADS-B Out as of January 1, 2020.
With the increasing popularity of ADS-B plus the availability of cheap parts, there's never been a better time to build your own ADS-B In receiver.
Required Parts
- Raspberry Pi (any version 2+ works)
- Micro SD Card (8+ GB)
- ADS-B USB Dongle
- 1090 MHz antenna
- Ethernet cord (if Raspberry Pi does not have WiFi)
Although there are many different types of receivers like DVB-T, ModeS, SBS1, and so forth, I recommend the DVB-T dongle linked above. I also recommend the linked 1090 MHz antenna. Keep in mind the recommended dongle and antenna come from JetVision, a European company. If you're in the US, expect shipping to take a couple weeks.
Setting Up the Raspberry Pi
Skip this step if you already have a Debian based Raspberry Pi running, or already know how to image a Pi with any Debian distro.
Although some flight tracking companies like FlightRadar24 offer pre-configured Raspberry Pi distros specifically designed for ADS-B, we're going to stick with a regular distro. This ensures our Pi can be used for other purposes, as well as ensuring compatibility with all modern Pi's. For example, FlightRadar24's Pi24 distro does NOT support Raspberry Pi 4's. For this tutorial, we'll use Raspberry Pi OS.

Put the Micro SD card into your computer. Install and run the Raspberry Pi Imager. For operating system, choose the recommended Raspberry Pi OS. Then press CTRL + SHIFT + X to open advanced options. If you want to control your Pi from your computer remotely instead of hooking up a monitor, keyboard, and mouse to the Pi, check enable SSH and set a password. If your Pi supports Wi-Fi and it'll be connecting to the internet that way, check configure Wi-Fi and enter your network's SSID and password. Exit out of advanced options and choose your SD card. Then press write.
Eject the SD card from your computer and place it into the Pi. Plug in your dongle/antenna plus ethernet if needed. Power up the Pi. To start controlling the Pi, either connect remote via SSH or manually via a plugged in monitor, keyboard, and mouse.
If using SSH, first find your Pi's local IP address. You can find your Pi's IP on your network's settings page by going to your network's default gateway. Default gateways usually look like 192.168.0.1 or 192.168.1.254. A guide to finding your default gateway can be found here. Once you've found your Pi's IP address, you can then go to the terminal. If you're running Windows, you'll need to enable SSH first by going to Settings > Apps > Apps & Features > Optional Features > Search and choosing to install the OpenSSH Client. Once ready, type ssh pi@[IP_ADDRESS] and enter your password. Now you can control your Raspberry Pi remotely over your home network.
Installing a Decoder
We'll need a decoder to process the data from the antenna. The decoder will also create an interactive map which can be viewed in a web browser.
Install the dump1090-mutability package:
sudo apt update
sudo apt install dump1090-mutability

sudo usermod -a -G plugdev dump1090
sudo systemctl restart dump1090-mutability
Then configure the decoder with the command below. You'll be presented with lots of config options. For almost all settings, the defaults are okay. Simply press enter to move on, or press tab until OK is selected and then press enter.
However, you'll want to configure the following settings...
- RTL-SDR dongle to use: 0
- Your receiver's Latitude (in decimal format): xx.xxxx
- Your receiver's Longitude (in decimal format): yy.yyyy
- Interface address to bind to (blank for all interfaces): remove the default 127.0.0.1 and keep it blank
sudo dpkg-reconfigure dump1090-mutabilityThese settings can be reconfigured anytime by editing the config file /etc/default/dump1090-mutability.
Then restart the decoder:
sudo systemctl restart dump1090-mutability
Configure terrain rings
Because 1090 MHz radio waves propagate via line of sight, the curvature of the earth as well as local terrain like mountains, trees, buildings, etc. will limit your receiver's range.
If you'd like your interactive map to show these physical limits with terrain rings, you can figure them with HeyWhatsThat. Go to (http://www.heywhatsthat.com/)[http://www.heywhatsthat.com/] and select "New Panorama". Enter your receiver's latitude, longitude, and elevation. Enter any title and press "submit request". Once your panorama is ready, find the map and select "up in the air" in the top right. Scroll to the bottom where two yellow and blue textfields are. Change the range to 10000-45000 ft since the "service ceiling" for commercial aircraft is around 450000 feet.
Grab your ID from the URL in the top left. It should look something like https://www.heywhatsthat.com/?view=[YOUR_ID]. With that ID, save your results locally with:
sudo wget -O /usr/share/dump1090-mutability/html/upintheair.json "http://www.heywhatsthat.com/api/upintheair.json?id=[YOUR_ID]&refraction=0.25&alts=3048,6096,9144,12192"The alts param in the URL makes rings for each height in meters. Thus 3048,6096,9144,12192 is 10000, 20000, 30000, and 40000 feet. Feel free to change these.
Then restart dump1090-mutability:
sudo /etc/init.d/dump1090-mutability restartView Interactive Map
With dump1090-mutability running, you can now view your map in a web browser:
[YOUR_RASPBERRY_PI's_IP_HERE]/dump1090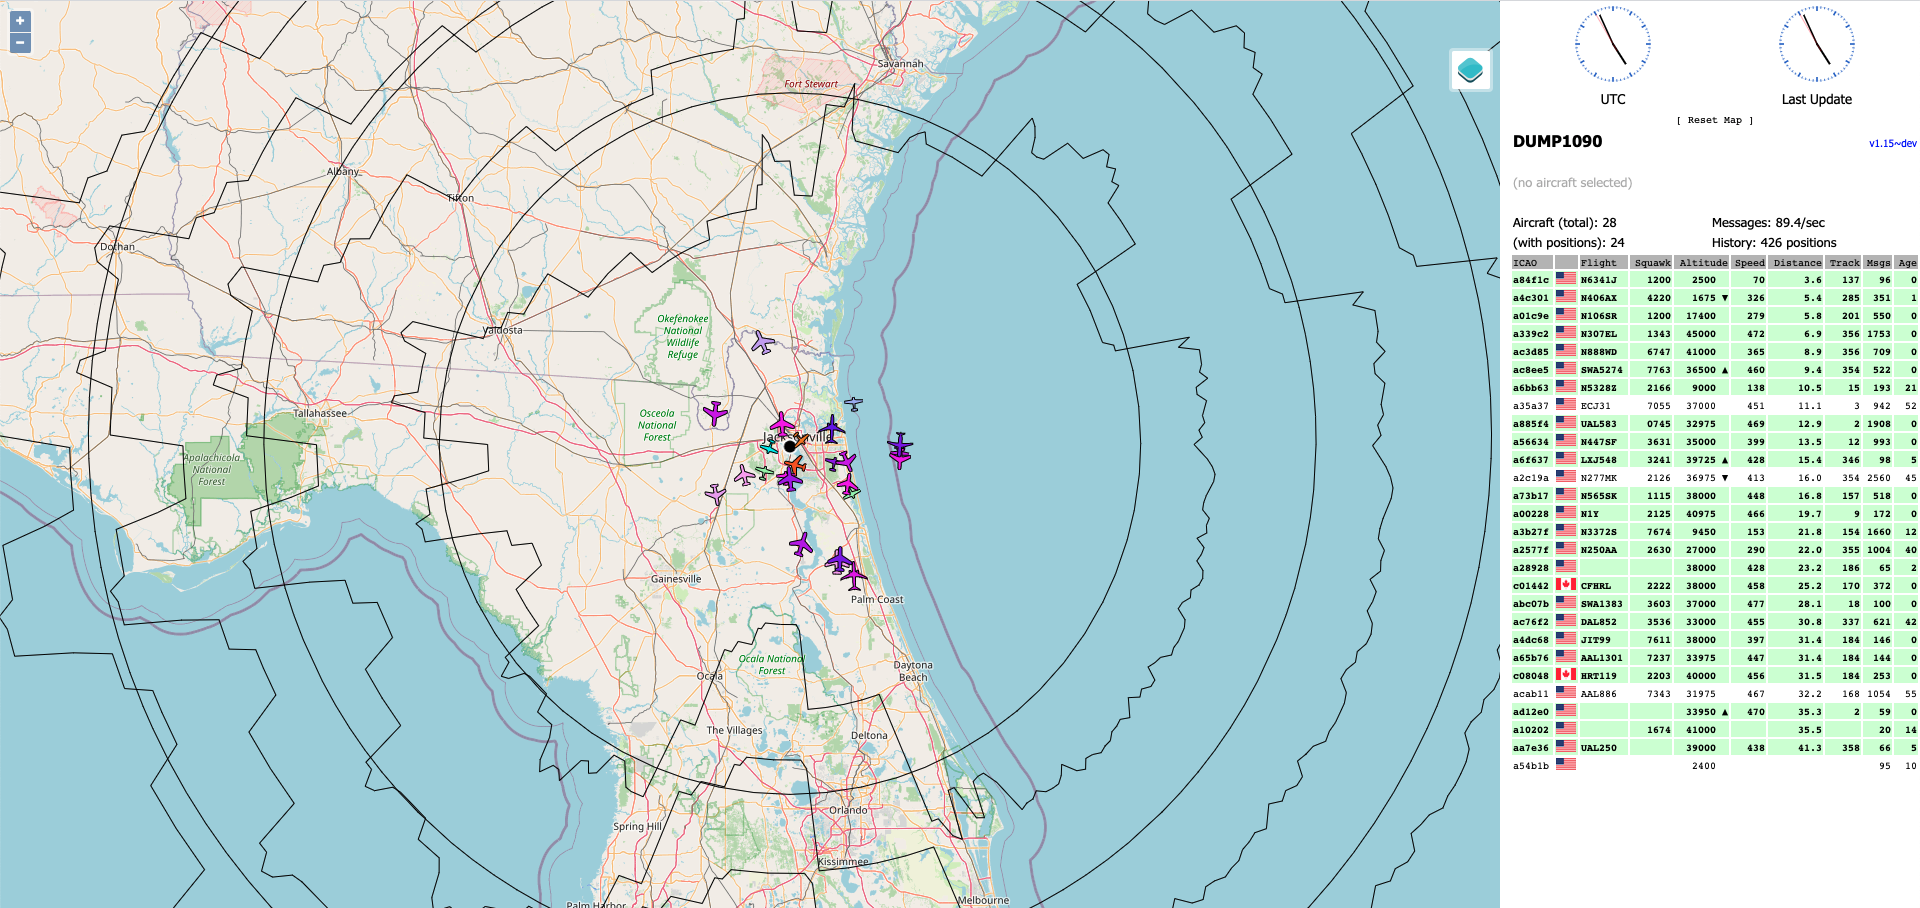
Congratulations! Your ADS-B receiver is now configured.
If you can't get the map to appear, the issue probably is either with your network or your installation of dump1090-mutability. Make sure your computer is on the same network as your Pi and that the IP you entered is your Pi's local IP address. You can also check if HTTP port 80 is open by specifying the exact URL like: http://[YOUR_RASPBERRY_PI's_IP_HERE]:80/dump1090/gmap.html. If you believe your network is working but dump1090-mutability wasn't installed properly, a great place to debug is forum boards. FlightRadar24 and FlightAware among others have active discussions regarding ADS-B and decoders like dump1090-mutability. Additionally, feel free to leave a comment on this blog article and I'll try to help.
Forward Data to Flight Tracking Services
Services like FlightRadar24 and FlightAware collect much of their data from crowdsourced ADS-B receivers. In exchange for contributing your data, many of these services give free licenses to their premium features.

FlightRadar24
FlightRadar24 rewards data contributors with a Business Plan subscription, usually $499/year, for free.
Make sure you've signed up for an account on FlightRadar24. Then run FlightRadar24's registration wizard with:
sudo bash -c "$(wget -O - http://repo.feed.flightradar24.com/install_fr24_rpi.sh)"For Step 4.1, do NOT select 1 - DVBT Stick (USB). Even though this tutorial uses a DVB-T stick, select 4 - ModeS Beast (USB/Network) to avoid downgrading your software. For Step 4.2, select 1 - Network connection. For Step 4.3A put 127.0.0.1 and for 4.3B put 30005. You can say no to Step 5 and 0 for Step 6A.
You can always reconfigure by running sudo fr24feed --reconfigure
Restart fr24feed:
sudo service fr24feed restartOnce your fr24feed is running with your account's email, your account will automatically be upgraded to business.
You can now also view a local webpage for FlightRadar24. Here you can see metrics and configure additional FR24 settings.
http://[YOUR_RASPBERRY_PI's_IP_HERE]:8754If you have issues configuring fr24feed, you can trying reinstalling it manually with the instructions here.
FlightAware
FlightAware rewards data contributors with an Enterprise Plan subscription, usually $959/year, for free.
Run the following commands to install the PiAware repository package:
wget https://flightaware.com/adsb/piaware/files/packages/pool/piaware/p/piaware-support/piaware-repository_5.0_all.deb
sudo dpkg -i piaware-repository_5.0_all.deb
sudo apt-get update
sudo apt-get install piaware
If you want PiAware to automatically upgrade, run:
sudo piaware-config allow-auto-updates yes
sudo piaware-config allow-manual-updates yes
FlightAware has their own decoders. Install those by running:
sudo apt-get install dump1090-fa
sudo apt-get install dump978-fa
Then restart your machine:
sudo rebootOnce your Pi has restarted, wait four to five minutes. PiAware should then connect your FlightAware account to your Pi. You can view your stats on FlightAware's website at https://flightaware.com/adsb/stats.
FlightAware's full tutorial can be found here. If you have any issues, you can contact them at ADSBsupport@FlightAware.com.
Operation and Optimizations
You'll need to worry about overheating and antenna placement when operating an ADS-B receiver.
Heating
Your setup will get hot. Your DVB-T stick will probably generate more heat than the Pi itself. Although some people online recommend using an active cooling mechanism, the setup this tutorial covers is fine without such a system. I've operated my setup for over a year and have yet to run into overheating issues. Just make sure you store your Pi somewhere not too hot.
Raspberry Pi recommends that devices operate under 85° C. You can always check your Pi' temperature by running:
vcgencmd measure_tempAntenna Placement
You'll also want to consider antenna placement. Although buying a fancier antenna could improve your range, the easiest way to increase range is to place your antenna high up and make sure its view is unobstructed.
Currently I operate my receiver indoors— It's on a desk about five feet from any walls to the outdoors. There are also trees surrounding most of the building. Given all this, my maximum range is about 50-60 nautical miles.
It's pretty neat to change where the antenna is placed and see how much the range changes. When I move my antenna closer to windows or outside, the range quickly improves. However, if you trap the antenna inside a Faraday cage by covering it up with metal, you'll see on your dump1090 map how quickly reception drops to zero.
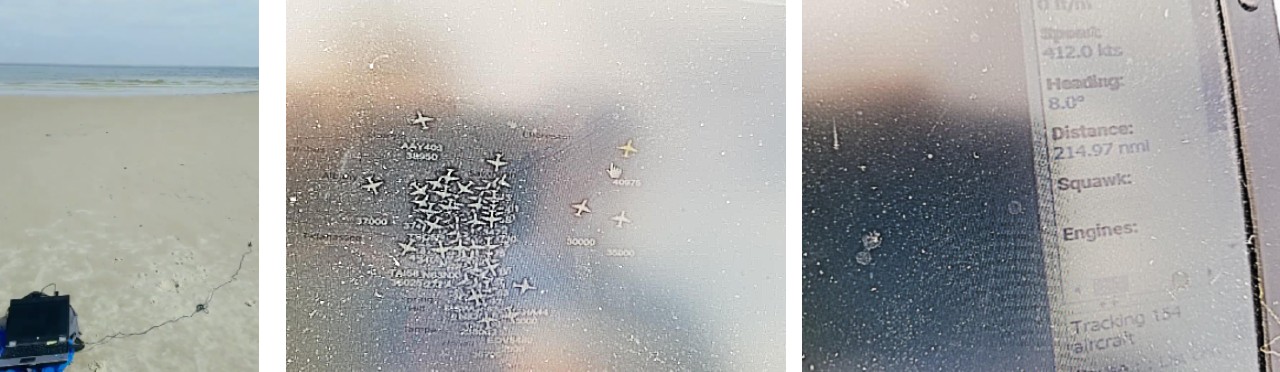
If you're looking for perfect range though, try going the beach. The clear view of the ocean will have you reading transoceanic flights very far out. My friend Will McCoy and I went to the beach to try this out, and sure enough, with the exact same antenna our max range jumped from 60 nm to 215 nm.
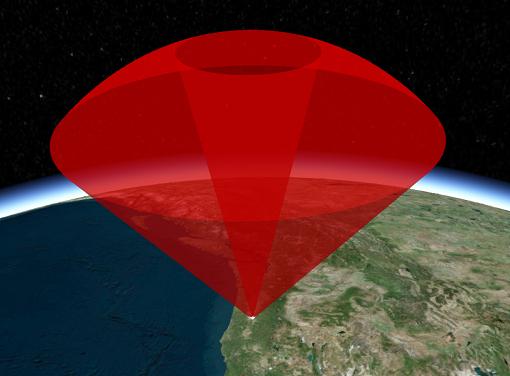
Also consider the coverage your antenna can receive. When comparing your ADS-B receiver to services like FlightRadar24 and FlightAware, you might be bummed to see your receiver misses planes that appear to be very close. However, this is likely because these aircraft are below your antenna's reception. For example, if you live near an airport, you'll notice you can only view departing aircraft on your dump1090 map once they reach a certain altitude (and therefore are inside your antenna's coverage). Ironically, it may appear you have better reception farther out because of this reception cone your antenna has.