Verifying SES Email Domain and DKIM Tokens in CloudFormation
Use custom resources to circumvent SES restrictions in CloudFormation and keep your IAC


-
-
To send emails through SES, AWS requires you to verify your email domain. You're also required to create DKIM tokens to authenticate your emails. DKIM tokens help email clients detect malicious emails like spoofed addresses or phishing scams.
If you're provisioning your next project with CloudFormation, AWS currently doesn't offer any first party solutions for verifying your domain or generating DKIM tokens. Instead, third party solutions with custom CloudFormation resources can be used.
How do custom CloudFormation resources work?
For anything not covered by AWS's own resource types, you can create or use custom CloudFormation resources. As a template developer, you can call your own custom resources, or even custom resources provided by other parties.
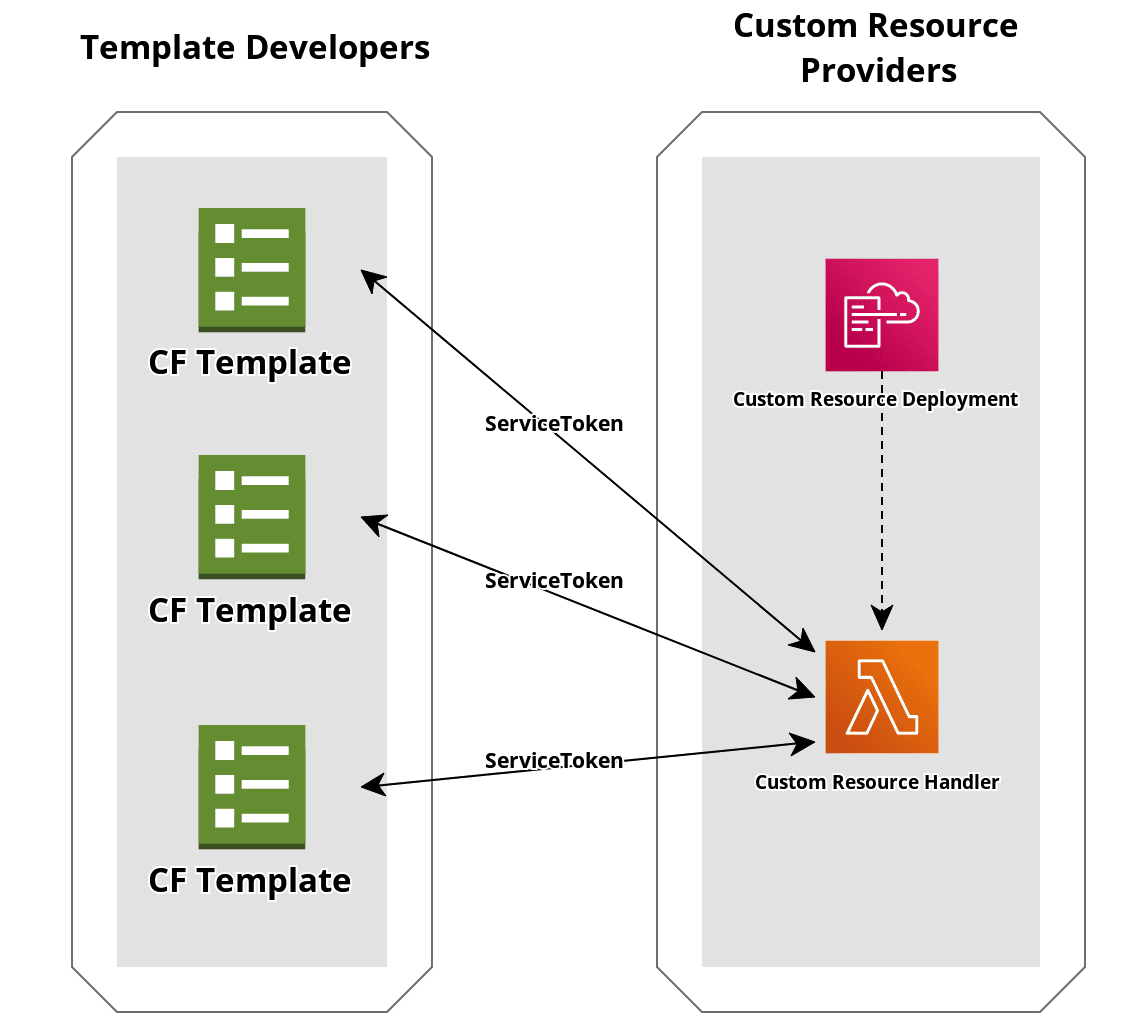
Custom resource providers define their own logic with AWS services like an SNS topic or a Lambda function. These resources can then be invoked in a CloudFormation template by creating a AWS::CloudFormation::CustomResource with the custom resource's unique ServiceToken. The service token is only required parameter. It maps the template's request to the logic defined by the custom resource provider.
CloudFormation Custom SES Provider
We can verify SES through CloudFormation using Binxio's custom resource provider. This project contains everything needed to handle SES verification. Although some providers will also include hosting their resource, this project does not. Therefore, there's no available ServiceToken to invoke until we host this through our own AWS account.
To provide this custom resource, we'll first deploy using Binxio's CloudFormation stack. You can either do this manually with the commands below or with the script in "Scripting Stack Deployment" section below.
git clone https://github.com/binxio/cfn-ses-provider.git

aws cloudformation deploy \
  --stack-name cfn-auto-managed-cfn-ses-provider \
  --template-file ./cfn-ses-provider/cloudformation/cfn-resource-provider.yaml \
  --profile [AWS_PROFILE] \
  --region [AWS_REGION]
Creating SES Resources
Once the SES stack is created, we can access our new resources in our CF template using the Custom::[CUSTOM_TYPE_NAME] type. Let's make two resources, one for domain identity, and another for DKIM tokens. In this example we'll provide our domain name with a CloudFormation param, but you can provide this any way you'd like. We'll also define the region with the AWS::Region pseudo param, but you should change this if you need an explicit region. Keep in mind SES verification is region based; you'll need to redo this process for each region you expect to send emails from.
EmailDomainIdentity:
  Type: Custom::DomainIdentity
  Properties:
    Domain: !Ref DomainName
    Region: !Ref AWS::Region
    ServiceToken: !Sub 'arn:aws:lambda:${AWS::Region}:${AWS::AccountId}:function:binxio-cfn-ses-provider'

EmailDkimTokens:
  Type: Custom::DkimTokens
  Properties:
    Domain: !GetAtt 'EmailDomainIdentity.Domain'
    Region: !GetAtt 'EmailDomainIdentity.Region'
    ServiceToken: !Sub 'arn:aws:lambda:${AWS::Region}:${AWS::AccountId}:function:binxio-cfn-ses-provider'
As you can see, the ServiceToken is the ARN for the Lambda we just created with Binxio's CloudFormation stack.
These CloudFormation resources will create a verified domain identity and DKIM tokens, as well as DNS records for both. You'll want to hook up these DNS records to your domain's hosted zone to prove ownership to SES.
EmailDNS:
  Type: AWS::Route53::RecordSetGroup
  Properties:
    HostedZoneId: !Ref HostedZone
    RecordSets: !GetAtt 'EmailDomainIdentity.RecordSets'

EmailDkimDNS:
  Type: AWS::Route53::RecordSetGroup
  Properties:
    HostedZoneId: !Ref HostedZone
    RecordSets: !GetAtt 'EmailDkimTokens.RecordSets'
If this is your first time using your domain and you don't have a Route 53 hosted zone yet, you can go ahead and make that too. Hosted zones instruct how to route traffic incoming to your domain.
HostedZone:
  Type: AWS::Route53::HostedZone
  Properties:
    HostedZoneConfig:
      Comment: 'Hosted zone for email records'
    Name: !Ref DomainName
With these CF resources, you now have a verified SES! You are now even closer to sending emails. Your last step will be to move out of the SES Sandbox, an environnement that all SES accounts start in to prevent email abuse. While in the sandbox, you can only send emails to email addresses you have manually verified. To leave the sandbox you must complete an application. Naturally to protect email reputation from SES, by design, this application cannot be completed through IAC. You can submit this application either through the SES management console online, or with the AWS SES CLI.
Scripting Stack Deployment
Since your own CloudFormation stack will be dependent on the SES custom resource stack being created, you can automate the process of conditionally creating the custom resource stack using the AWS CLI and some scripting. The following ShellJS script can be used to deploy both stacks.
const sh = require('shelljs');

const { AWS_CLI_PROFILE, REGION, STACK_NAME } = process.env;

function getSesStackStatus() {
  const sesCfStackStdout = sh.exec(
    'aws cloudformation describe-stacks ' +
      `--stack-name cfn-ses-provider ` +
      `--profile ${AWS_CLI_PROFILE} `,
    { silent: true },
  ).stdout;

  const startIndex = sesCfStackStdout.indexOf('StackStatus');
  const endIndex = sesCfStackStdout.substring(startIndex).indexOf('\n');
  const keyValuePair = sesCfStackStdout.substring(
    startIndex,
    endIndex + startIndex,
  );

  return keyValuePair.split(': ')[1];
}

if (getSesStackStatus() !== 'CREATE_COMPLETE') {
  sh.echo(
    'Downloading CloudFormation custom providers for handle AWS SES domain configuration',
  );

  if (!sh.test('-d', 'cfn-ses-provider')) {
    sh.exec('git clone https://github.com/binxio/cfn-ses-provider.git');
  }

  sh.exec(
    'aws cloudformation deploy ' +
      `--stack-name cfn-ses-provider ` +
      '--template-file ./cfn-ses-provider/cloudformation/cfn-resource-provider.yaml ' +
      `--profile ${AWS_CLI_PROFILE} ` +
      `--region ${AWS_REGION} `,
  );

  sh.rm('-rf', 'cfn-ses-provider');
}

sh.exec(
  'aws cloudformation deploy ' +
    `--stack-name ${STACK_NAME} ` +
    '--template-file ./template.yml ' +
    `--profile ${AWS_CLI_PROFILE} ` +
    `--region ${AWS_REGION} `,
);